As we mentioned above, WCS3 supports only DTLS 1.0, which is not supported anymore in modern browsers.
Therefore, WebRTC traffic is not transmitted between the browser and the WCS server, and there is no sound in SIP calls using WCS3 API.
WCS5 supports DTLS 1.2, but API is significally changed. So, you cannot do without correcting your code.
All confidential information (data for connecting to the SIP server and the number for the call) was hidden in REST-hooks.
Step-by-step manual how to implement it:
Step1. Install and configure Nginx and PHP.
Then, in the
nginx.conf file in the "
server" section, add the following lines
Code:
location / {
    try_files $uri $uri/ /index.php?$request_uri;
    }
Step 2. In the directory for the site (I have
/var/www) create a file "
index.php", in this file place the following code
Code:
<?php

$api_method = array_pop(explode("/", $_SERVER['REQUEST_URI']));
$incoming_data = json_decode(file_get_contents('php://input'), true);
switch($api_method) {
    case"connect":
    $rest_client_config = json_decode(file_get_contents('rest_client_config.json'), true);
    $incoming_data['restClientConfig'] = $rest_client_config;

    $incoming_data['sipLogin'] = "####";
    $incoming_data['sipAuthenticationName'] = "####";
    $incoming_data['sipPassword'] = "############";
    $incoming_data['sipDomain'] = "################";
    $incoming_data['sipOutboundProxy'] = "############";
    $incoming_data['sipPort'] = "####";
    break;
    case "call":
    // Callee Number
    $incoming_data['callee'] = "########";
    break;
}
header('Content-Type: application/json');
echo json_encode($incoming_data);

function ubnormalResponse($code) {
    if ($code == 403) {
    header('HTTP/1.1 403 Forbidden', true, $code);
    } else {
    header(':', true, $code);
    }
    die();
}
?>
Step 3. In the same directory
/var/www create a file "
rest_client_config.json". The source code can be found at the end of this page
https://docs.flashphoner.com/display/WCS52EN/Using+REST+hook+to+authorize+user+by+domain.
In the "
rest_client_config.json" file, edit the "
call" section like this:
Code:
"call" : {
    "clientExclude" : "",
    "restExclude" : "",
    "restOnError" : "LOG",
    "restPolicy" : "OVERWRITE",
    "restOverwrite" : "callee"
  },
Step 4. Then, go to the WCS server.
Using the "curl" command, check the availability of the REST Hook script for the events
/connect and
/call
Code:
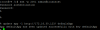
curl http://172.16.30.123/connect
curl http://172.16.30.123/call
replace "172.16.30.123" with the IP address or domain name of your backend webserver
Curl If the command output contains the necessary information are parameters for the SIP connection and the local phone number, so we set up properly REST Hook.
Step5. Go to CLI WCS server
Code:
ssh -p 2001 admin@localhost
default password: admin
and change the default Rest Hook handling application to our new script
Code:
update app -l http://172.16.30.123/ defaultApp
replace "172.16.30.123" with the IP address or domain name of your backend webserver
Step 6. After all these settings, we create two empty files
click-to-call-min.html and
click-to-call-min.js on the front-end web server. These files will contain the minimum code to implement the "Click to call" button
HTML code:
Code:
<!DOCTYPE html>
<html lang="en">
<head>
    <meta charset="utf-8">
    <script type="text/javascript" src="../../../../flashphoner.js"></script>
     <script type="text/javascript" src="click-to-call-min.js"></script>

</head>
<body onload="init_page()">
    <input type="button" id="callBtn" type="button" Value="Call"/>
     <div id="remoteAudio"></div>
    <div id="localAudio"></div>
</body>
</html>
JS code:
Code:
var SESSION_STATUS = Flashphoner.constants.SESSION_STATUS;
var CALL_STATUS = Flashphoner.constants.CALL_STATUS;
var localAudio;
var remoteAudio;


function init_page(){
     Flashphoner.init({});
     localAudio = document.getElementById("localAudio");
    remoteAudio = document.getElementById("remoteAudio");
    connect();
}

function connect() {
     var url = "wss://172.16.30.124:8443"
    var registerRequired = true;
    var sipOptions = {
        registerRequired: registerRequired
    };
    var connectionOptions = {
        urlServer: url,
        sipOptions: sipOptions
    };
    console.log("Create new session with url " + url);
    Flashphoner.createSession(connectionOptions).on(SESSION_STATUS.ESTABLISHED, function (session) {
        console.log(SESSION_STATUS.ESTABLISHED);
    }).on(SESSION_STATUS.REGISTERED, function (session) {
        console.log(SESSION_STATUS.REGISTERED);
    });
     callBtn.onclick = call
}


function call(session) {
     var constraints = {
        audio: true,
        video: false
    };
     var session = Flashphoner.getSessions()[0];
    var outCall = session.createCall({
        remoteVideoDisplay: remoteAudio,
        localVideoDisplay: localAudio,
        constraints: constraints,
        stripCodecs: "SILK"
     });
    outCall.call();
     callBtn.value = "Hangup";
     callBtn.onclick = function () {
          callBtn.value = "Call";
          outCall.hangup();
     connect();
     }
}
Step 7. Open the created HTML page and check the work:
Examples of files in the attached archive.